I started the day with a nice cup of coffee and as tomorrow is May 1st I needed to put some art on the May page in my calender. I bought a inexpensive ugly one to redo to my liking and have had fun each month painting, drawing and gluing items in. It has turned out to be a test kitchen of sorts to tryout a new pen, crayon or idea. This month I used the stencil and a small piece of fabric from the bags I was making. I was going to show more photos of the calender but my computer rolled over and died, I'm borrowing my husbands to post today and will be heading to the fix it shop.
The little bag in the top right hand corner is actually a makeup bag with clear pockets, a few years ago a few of use made travel art supply kits and boy has it worked out well. It is the right size to hold pencils, paints and even a small journal, perfect for a car trip or on a plane.
Have a nice weekend, warm weather and the garden are calling.
Friday, April 30, 2010
Tuesday, April 27, 2010
The making of an art bag.
Last year for some classes I was teaching I made fabric bags to put the hand outs and supplies in, they were well received so I decided to make more for this year. I would like to share how I do this and show you how easy it is to make a unique little bag.
I start with 6 yards of very inexpensive muslin, I tear it down to a manageable size in my case no larger than a 6 foot table. I gather old text from books, a 2" paint brush and plastic sheeting to work on.
I then mix 1 part white glue to 1 part water. I brush the muslin first with the glue mixture then place the text on it and brush the text layer with the glue mixture. I prefer to work in smalls sections, when the entire piece of muslin is covered I let it dry over night. After it is dry you can paint and sew on as any other fabric.
The other half of the bag is made from the same muslin, I dyed it with beet juice then splattered paint on it and hung it out side to dry.
I tore the fabric to the desired size and stenciled with acrylics and spray paint.
I was not in love with the dyed fabric to say the least but after I put the bird stencil down and added the black spray paint it dulled it up to my liking.
Before you sew it together you can add a pocket, I used a small piece of vinyl. I also put all my seems on the outside I just think it looks better for this project.
Friday, April 23, 2010
Friday Desk Photo- Santos Clothes
This week I brought out the fabric and paints, making a little jacket for a new Santos.
Jacket details, I stamped russet numbers and highlighted them with pearl X. The edging is made from resin paper on antique text.
Monday, April 19, 2010
A near miss and nature!
I walked to the garden this morning with a cup of coffee and my senses had an over load. The taste of a good cup, the honking sound of geese just lifting of the river so close I could hear the air on their wings, I picked a fresh stem of Lily of the Valley one of my favorites and inhaled the rich sweetness of it.
My eyes had a color palette laid before them, I had to get the camera.
My neighbor is running in the Boston marathon today and I was ask to feed the dog and watch over the farm. This is a Hair sheep no wool and you never need to sheer them it just falls out, to bad I would love to have some wool to felt.
This is Patch he watches the sheep, and boy do they watch him.
AND THEN IT HAPPENED
photo from google images
I had just come home from the farm when a branch came past my head at about 60mph and hit 10 feet in front of me. An over dose of adrenalin coursed through my body as I tried to find who hurled the missile, I looked skyward and saw a large Osprey with a small branch in it's talons.
Friday, April 16, 2010
Friday Desk Photo- 1st one
My work space this morning.... I would like to photograph my desk every Friday and see how the projects change over several months, a single date and one photo example how will it tell the story over time.
Recently I have enjoyed time researching the history of the Santos. I find the imagery and art of idols fascinating, I was held up on my internet surfing for a short time looking at all the wood Santos carvings from Guatemala and found out that a person making one is called a santero.
I made a version of The Virgin Guadalupe. My goal was to see if I could get a wood look by painting on acrylics and then rubbing off. It's not bad in person but stills needs work.
Tuesday, April 13, 2010
My Personal Santos
"Our Lady of Letters" is her name, I sure can use a patron saint to help me spell.
Monday, April 12, 2010
Studio helper and link to tutorial !
I had help the other day my beautiful granddaughter Savannah.
One of our first jobs was to brush off the Tic Tac's before we ate them.
I put a felted soap tutorial on the Portland Art Collective blog, You can try out the first steps of felting with the soap then move on to this cute little hat Savannah is wearing. I made this for a class I was teaching, she fell in love with it and now owns it.
Tuesday, April 6, 2010
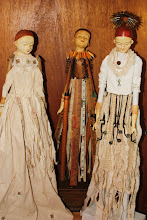
The girl with attitude goes first
This is the face I was not in love with, I really did want to make a Santos with a angelic face and in it's place I got attitude. I can work with attitude so she was first of the three to be put together.
Her main body is an old shoe stretcher, her legs are the handles of a croquet mallet, and she stands on a antique phone box. Even her body says she has attitude.
Subscribe to:
Posts (Atom)